GUI
Introduction
This tutorial will teach you how to set up and use the Syntacts GUI. The GUI can be thought of as a companion app to the programming API, where you can quickly prototype and design cues before implementing them in your Syntacts-driven application. Before reading this tutorial, it is recommended that you read one of the programming API tutorials so you have a basic understanding of Syntacts mechanisms and terminology.
Basic Setup
- Download the latest Syntacts release for your system and extract the files.
- Run the GUI executable
syntacts_gui, located in the top-level directory. - On Windows, you may receive a “Windows protected your PC” screen. Click “More info”, then “Run anyway”.
- On macOS, the executable
syntacts_guimay not run, and it will instead open the binary code. If this occurs, open a Terminal and run the following command in the directory ofsyntacts_gui. After this, you will be able to successfully runsyntacts_gui.
> sudo chmod 777 syntacts_gui
GUI Widgets Overview
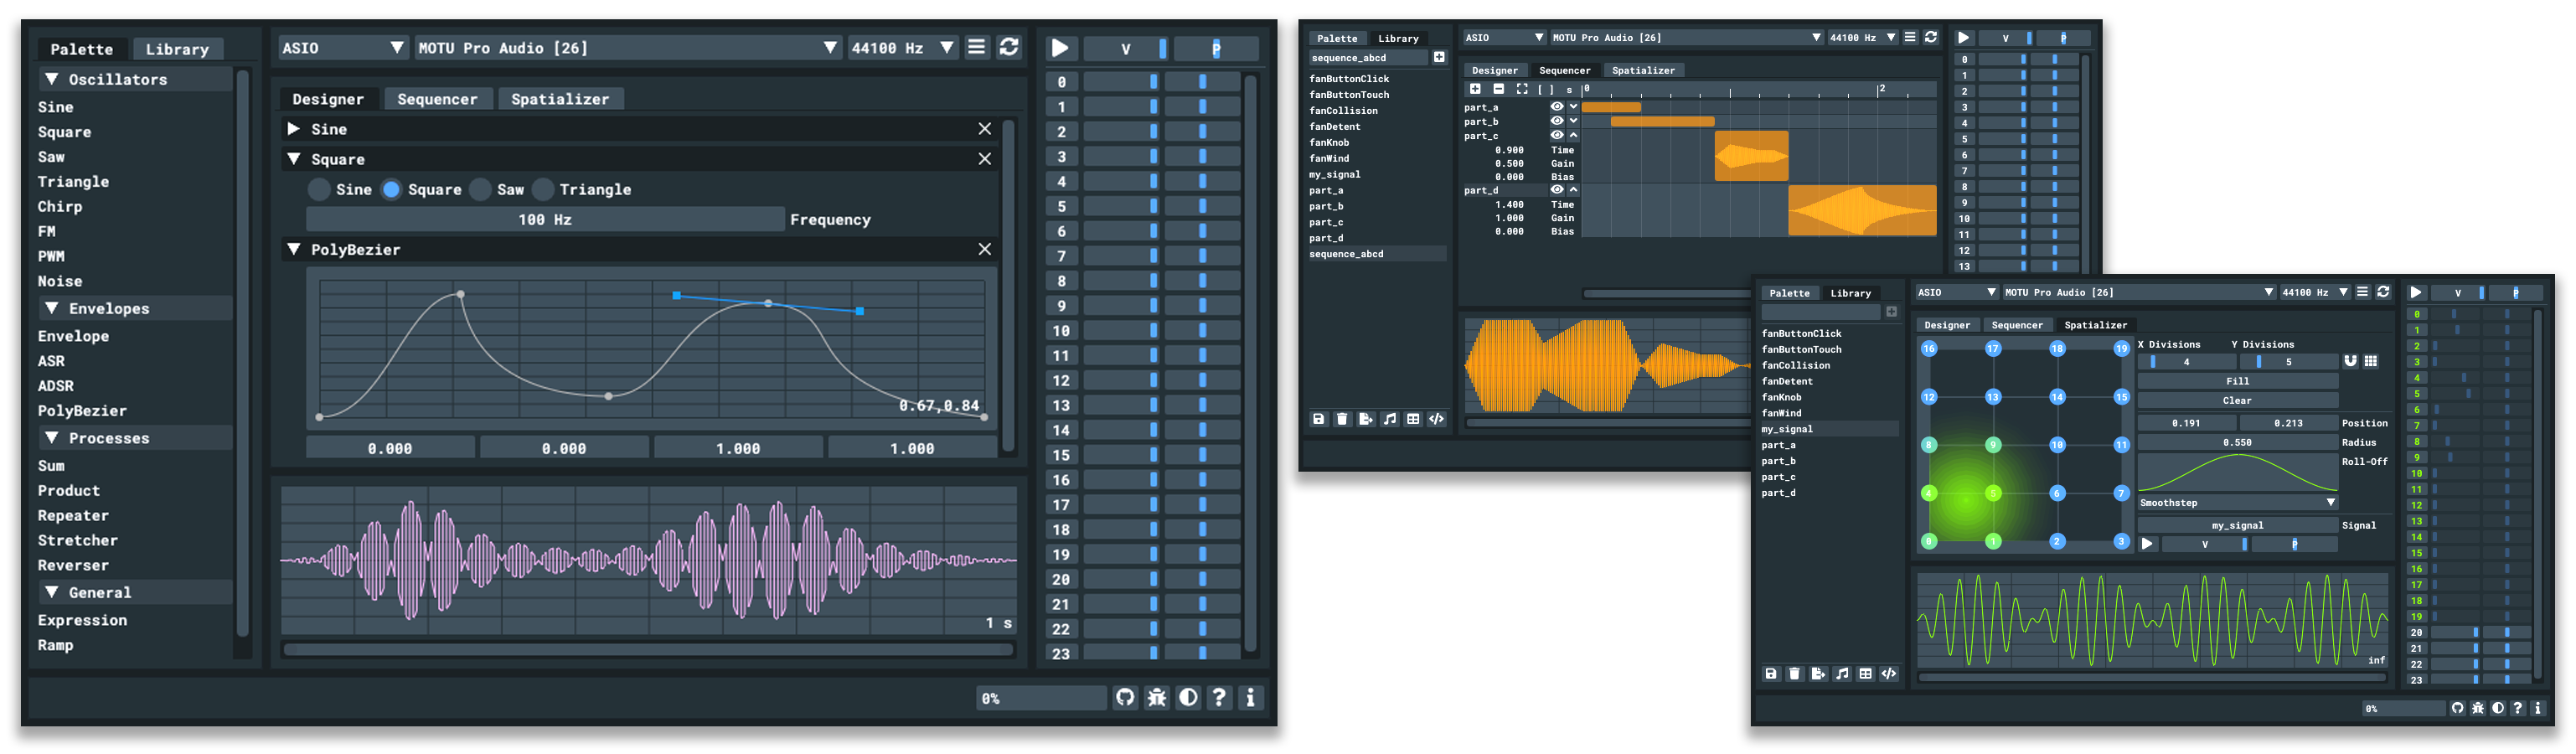
The GUI is composed of six main widget areas: Device Bar, Info Bar, Palette/Library, Designer/Sequencer/Spatializer, Visualizer, and Player. The functionality of each widget is explained in the following sections.

Device Bar
- The Device Bar is where you select the audio interface you wish to use for the current session.
- Using the drop-down menus, you can choose your API, device, and sample rate.
- The second button from the right will show a pop-up window listing all available devices. Devices denoted with a
*are system or API defaults. - The last button will refresh the Syntacts session if you need to reconnect/reboot a device.
Info Bar
- The Info Bar displays relevant information and tooltips when you hover over buttons and areas in the GUI.
- You can get useful information and tips by dragging and dropping the
?button over widgets. - You can change the theme of the GUI from the Info Bar.
- The meter displays the CPU thread load of the Syntacts session.
- Buttons for opening the Syntacts website, GitHub page, and other resources are available.
- The “bug” button will display debug and diagnostics information.

Palette
- The Palette lists available signals for creating cues. Signals represent various vibration waveforms, envelopes, and processes.
- Drag and drop signals from the Palette into slots on the Designer widget.
Designer
- The Designer widget offers a node-based editor where you can drag and drop any number of signals from the Palette into slots.
- The resulting waveform is the product of each slotted signal and is displayed in the Visualizer widget.
- When a signal is slotted into the Designer, a variety of controls will be presented.
- You can double click numeric controls for keyboard entry, or click and drag them horizontally to change the value.
- Some signal nodes accept other signals or Library items as their inputs (e.g. Sum, Repeater, etc.).
- To delete a cue, simply click the
Xon the slot header.
Visualizer
- The Visualizer displays a 2D graph of the current signal.
- The displayed signal is context-dependent and changes depending on what tab you are in, or if you are hovering over a Library item.
- A horizontal scrollbar at the bottom of the Visualizer allows you to zoom in on the signal.
- The duration of the signal, in seconds, is displayed at the bottom-right. Infinitely long signals display “inf”.
Library
- Once you’ve created a signal to your liking, you can save it to the global Syntacts library.
- Saved signals can be loaded from any of the programming APIs.
- Buttons at the bottom of the widget allow you to delete, overwrite, and export Library items to
.tact,.wav,.json, and.csvfile formats. - You can import files of the same extensions by dragging them onto the Syntacts GUI window.
- If you right-click a Library item, a context menu with various actions will be displayed.
Player
- The Player widget is where you play signals on the currently selected device.
- Clicking the main Play button will play the current signal on all available channels.
- Clicking a channel number button will play the current signal only on that channel.
- Right-clicking either the Play or channel number buttons will stop the channel.
- You can drag signals from the Library onto buttons to play them.
- Sliders for volume (V) and pitch (P) are available. Right-click on these to toggle them on or off.
Sequencer
- The Sequencer widget can be used to temporally arrange multiple signals.
- Add or remove tracks with the
+and-buttons. - Drag signals from the Library onto the
+button or into an unoccupied track to put it into the sequence. - Drag slotted signals horizontally to change their start time.
- You can also adjust the gain and bias by expanding the track with the down arrow buttons.
- You can play the sequenced signal on the Player, or save it to the Library.
Spatializer
- The Spatializer widget allows you to create “continuous” 1D or 2D arrays from your devices’ channels.
- Channels in the Spatializer will have their volume scaled based on their proximity to the target zone and its roll-off method.
- You can drag channels from the Player onto the grid, or change the grid dimensions and automatically fill it (click twice to change between row or column major).
- Channels consumed by the Spatializer will be highlighted and disabled in the Player.
- You can slot a signal to be spatialized by dragging it from the Library.
- The target location can be changed by a right-click and drag in the grid area.
- The target radius can be changed with the mouse wheel, and the roll-off method can be changed via the dropdown menu.