C++ API
Introduction
This tutorial will teach you how to setup and use the Syntacts C++ API. You should have first built and installed the Syntacts library to your system. For this tutorial we will use CMake to manage our project and build. However, the process should be similar if you are using an IDE such as Visual Studio or Xcode.
Requirements
- C++ compiler
- CMake
Basic Setup
- If you haven’t already, build and install Syntacts.
- Create an empty directory for your project.
- Create a new
CMakeLists.txtbuild script with the following contents:
# create a new CMake project
cmake_minimum_required(VERSION 3.13.0)
project(MySyntactsProject VERSION 1.0.0)
# find the installed Syntact libraries
find_package(syntacts REQUIRED)
# create an executable from main.cpp and link it against Syntacts
add_executable(myApp main.cpp)
target_link_libraries(myApp syntacts)
If you don’t want to install Syntacts to your computer, you can alternatively use CMake’s
FetchContentfunction. This will clone Syntacts in your project directory, build it, and then link your application.# create a new CMake project cmake_minimum_required(VERSION 3.13.0) project(MySyntactsProject VERSION 1.0.0) # clone Syntacts in-place and build include(FetchContent) FetchContent_Declare(syntacts GIT_REPOSITORY https://github.com/mahilab/Syntacts.git) FetchContent_MakeAvailable(syntacts) # create an executable from main.cpp and link it against Syntacts add_executable(myApp main.cpp) target_link_libraries(myApp syntacts)
- Add a C++ source file
main.cppwith the following contents:
#include <syntacts>

using namespace tact;

int main(int argc, char const *argv[])
{
    Session s;
    s.open();
    s.playAll(Sine(440));
    sleep(2);
    return 0;
}
Building
- After you’ve created
CMakeLists.txtandmain.cpp, open Powershell (or Terminal) in the directory that contains those files. - Make sure CMake is added to your system PATH.
- Run the following commands:
mkdir build                      # make out-of-source build folder
cd build                         # change directory
cmake ..                         # generate build files from our CMakeLists.txt file
cmake --build . --config Release # build the project
- When the build completes, find the output file
myApp.exein the build folder and run it. You should hear a two second 440 Hz sine wave from your default speakers. If you have a tactor connected to your audio output, try changing the frequency to an appropriate value for the tactor (e.g. 150-250 Hz).
API Overview
Session
- Using Syntacts begins with creating a
Session, or an audio-context that manages communication with an output device. - Devices available for opening can be enumerated and queried for information using a
Session:
Session session;

for (auto& d : session.getAvailableDevices()) {
    auto& dev = d.second;
    std::cout << dev.index << std::endl;
    std::cout << dev.name  << std::endl;
}
- Devices can be opened using the
openfunction. - The no-argument overload will open the system default audio device (usually the main speakers).
- Non-default devices can be opened by passing a device index argument or the device name and preferred API:
// open default device
session.open();
session.close();
// open device by index
session.open(22);
session.close();
// open device by name and preferred API
session.open("MOTU Pro Audio", API::ASIO);
session.close();
- Device indices represent the combination of a device and an API it supports. Therefore, one device may have multiple indices each with a different API.
- You can retrieve your device’s index and/or name by iterating as in the above example, or by opening the Syntacts GUI and viewing the information there.
Warning: Device indices are NOT persistent. They may change when devices are power cycled, plugged/unplugged, or when other devices are connected to the PC. If you need a persistent method of opening a device, use the name + API version of
open.
| Relevant Header(s) | Relevant Examples(s) |
|---|---|
| Session.hpp | example_devices.cpp |
Signals
- Vibration waveforms are represented by one or more Signals. You can create Signals of different behaviors and lengths.
- Sine, Square, Saw, and Triangle classes are available in Syntacts. These implement typical oscillators with normalized amplitude and infinite duration.
- Basic oscillators can be created by calling their constructors:
Signal sin = Sine(10);      // 10 Hz Sine wave
Signal sqr = Square(250);   // 250 Hz Square wave
Signal saw = Saw(175);      // 175 Hz Saw wave
Signal tri = Triangle(440); // 440 Hz Triangle wave (audible and ok for speakers)
- Oscillators alone have an infinite duration or length and a constant amplitude.
- You can use the Envelope, ASR, and ADSR (Attack, (Decay), Sustain, Release) Signals to define amplitude modifiers with finite duration:
// This is a basic envelope that specifies amplitude (0.9), and duration (0.5 sec)
Signal bas = Envelope(0.9, 0.5);
// This is an attack (0.1 sec), sustain (0.1 sec), release (0.1 sec) envelope. The sustain amplitude is 1.0.
// Envelopes can interpolate between amplitudes with different curves.
// This example uses smoothstep interpolation (sigmoid) for the attack and linear interoplation for release.
Signal asr = ASR(0.1, 0.1, 0.1, 1.0, Curves::Smootheststep(), Curves::Linear());
- Signals can be mixed using basic arithmetic. Multiplying and adding Signals can be thought of as an element-wise operation between two vectors.
- Multiplying two Signals creates a new Signal of duration equal to the shortest operand.
- Adding two Signals creates a new Signal of duration equal to the longest operand.
- Gain and bias can also be applied to Signals with scalar operands.
- Below are basic examples of mixing the Signals from above:
Signal sig1 = sqr * sin;  // duration is infinite
Signal sig2 = sig1 * asr; // duration is 0.3 seconds
Signal sig3 = 0.5 * (sqr + sin) * asr;
-
Signals created in the above examples:
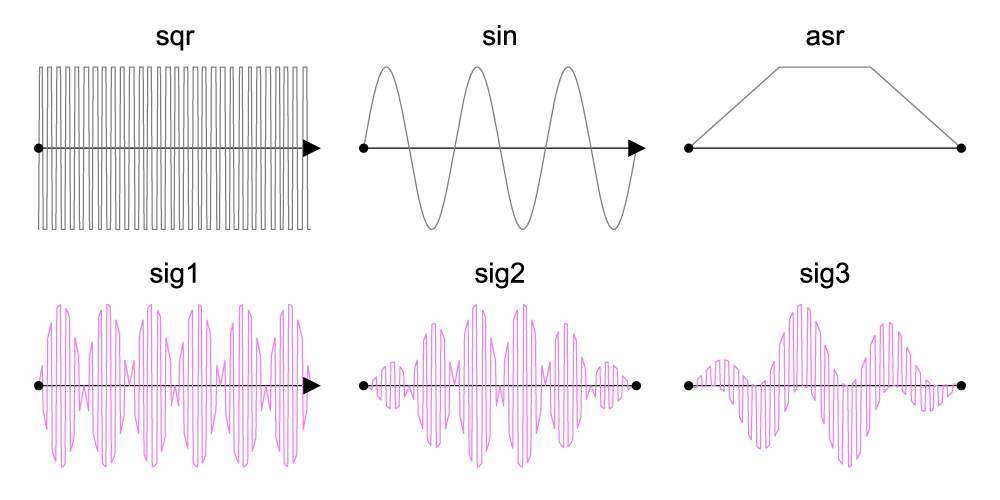
-
Complete signals can be made and mixed in-place as well.
// 250 Hz square wave amplitude modulated with a 20 Hz sine wave and ASR envelope.
Signal sig4 = Square(250) * Sine(20) * ASR(1,1,1);
- Once you have created a complete Signal, it can be played on the Session.
session.play(0, sig1); // plays sig 1 on channel 0
sleep(3);              // sig1 plays for 3 seconds
session.stop(0)        // stop sig1

session.play(1, sig2); // plays sig2 on channel 1
sleep(sig2.length());  // sig2 plays for its length of 0.3 seconds
                       // Do not need to stop sig2 because it is finite
Note: If you want to evaluate Syntacts without tactor hardware, make sure the frequency is high enough to be audible for speakers (e.g. 440 Hz). Low frequencies can potentially damage speakers! For this reason, most of the Syntacts examples are coded with frequencies in the hearing range. If you are actually outputting to a tactor, use frequencies appropriate for it (e.g. 150-250 Hz).
| Relevant Header(s) | Relevant Examples(s) |
|---|---|
| Signal.hpp, Oscillator.hpp, Envelope.hpp, General.hpp | example_signals.cpp |
Sequences
- Multiple Signals can be ordered in time using Sequences.
- You can concatenate Signals using the insertion, or left-shift, operator
<<. - Delay and pause are achieved through the insertion of positive scalar operands.
- Negative scalar operands move the insertion points backwards in time, allowing for the overlay or fading of Signals into each other.
- Below is a basic example of creating Sequences:
Signal sigA = Sine(440) * ASR(1,1,1);      // create 3 second Signal
Signal sigB = Square(440) * ADSR(1,1,1,1); // create 4 second Signal

// 7 second Sequence with sigA before sigB
Sequence sig4 = sigA << sigB;
// 1 sec delay and 2 sec pause, 10 sec Sequence
Sequence sig5 = 1 << sigA << 2 << sigB;
// 1 sec fade/overlay between sigA and sigB, 6 sec sequence
Sequence sig6 = sigA << -1 << sigB;
-
Sequenced signals created above:
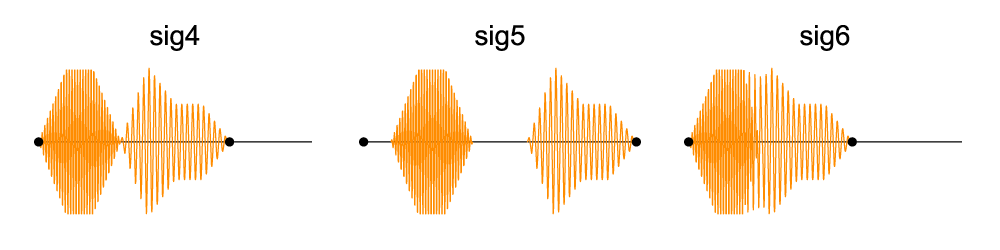
-
Sequences can also be concatenated:
// Sequence of sig4, sig5, and sig6. Note this will also modify sig4.
Sequence sig7 = sig4 << sig5 << sig6;
// Play sig7 on channel 0 for its length of 23 seconds
session.play(0, sig7);
sleep(sig7.length());
- You can also insert Signals into an existing Sequence timeline:
// insert 1 s of noise starts at the 4 second mark of sig5
sig5.insert(Noise() * Envelope(1), 4);
// play sig5 on channel 0
session.play(0, sig5);
sleep(sig5.length())
| Relevant Header(s) | Relevant Examples(s) |
|---|---|
| Sequence.hpp | example_sequences.cpp |
Spatializers
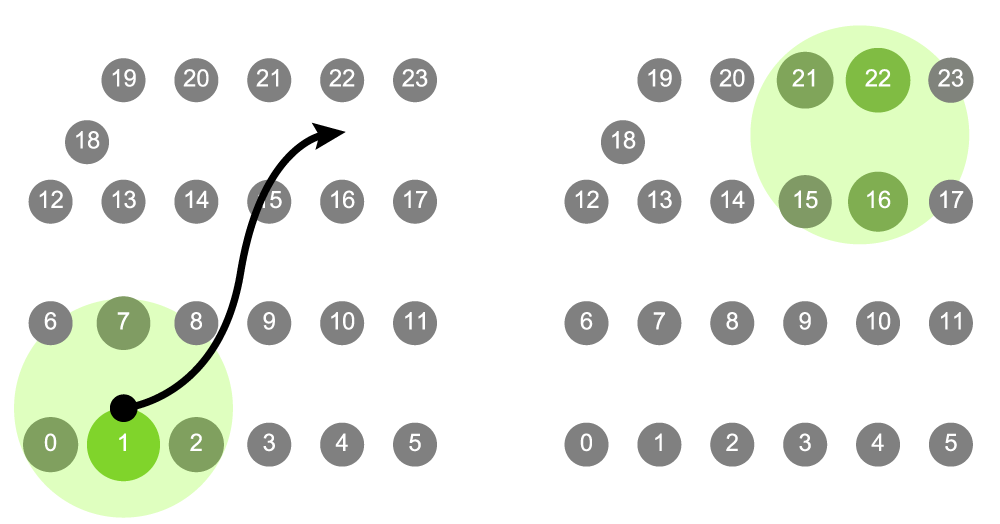
- Spatializers map multiple channels to a normalized (0 to 1) continuous 1D or 2D spatial representation.
- For example, you can configure a virtual grid to match the physical layout of a tactor array.
- You can then set a virtual target coordinate and radius to play and blend multiple tactors at once.
- Only channels within a target radius are played.
- The volume of channels is interpolated according to a specified roll-off law (ie. linear, logarithmic, etc.) based on their proximity to the target location using. The roll-off law can be changed with
setRollOff. - Below is an example of creating a spatializer:
Spatializer spatial(&session);        // create 2D Spatializer

spatial.createGrid(4,6);              // Grid of 4 rows x 6 cols
spatial.setPosition(18,0.1,0.8);      // move channel 18 by x = 0.1, y = 0.8
spatial.setRadius(0.3);               // effect radius
spatial.setRollOff(Curves::Linear()); // set roll off method
spatial.setTarget(0.2, 0.1);          // target location
spatial.play(sig1);                   // play Signal
sleep(3);                             // wait 3 seconds while the Signal plays
- To create sweeping motions with tactile arrays, you can move the target location in a
whileorforloop along a predescribed path. - Master volume and pitch of the Spatializer can also be modified using
setVolumeandsetPitch.
while (condition) {
    spatial.setTarget(x,y);
    spatial.setVolume(v);
    spatial.setPitch(p);
}
-
The Spatializer created in the examples above:
- Channel positions can be set as uniform grids (as above) or individually using
setPosition. - Below is an example of custom channel positioning:
int chs = session.getChannelCount();
// set up position of channels, evenly distributed
double spc = 1.0 / (chs - 1);
for (int i = 0; i < chs; ++i)
    spatial.setPosition(i, i * spc);
| Relevant Header(s) | Relevant Examples(s) |
|---|---|
| Spatializer.hpp | example_spatializer.cpp |
Library
- Signals can be saved to a disk and reloaded at a later time using Library.
- In Syntacts, the default file format is a binary representation of the serialized Signal.
- This saves only the parameters needed to reconstruct the Signal at runtime instead of saving all individual audio samples.
- Using this format creates smaller files which can be loaded more quickly on the fly than other audio file formats.
- To save and import in the default location (i.e. APPDATA/Syntacts/Library), use the functions
saveSignalandloadSignal:
// Make a Signal to save/export, and a blank Signal to import in to
Signal out = Sine(440) * ASR(1,1,1);
Signal in;

// Syntacts Binary Format (Default Location, i.e. APPDATA/Syntacts/Library)
Library::saveSignal(out, "out"); // file name is in quotation marks
Library::loadSignal(in, "out");
- Signals can be saved and imported in other file locations using the functions
exportSignalandimportSignal. - You can customize the file location by specifying the file path. This is changed using quotation marks:
"file path". - Files can be saved with a relative or absolute path:
// Binary format saved in a custom location
// Export/import with a relative path
Library::exportSignal(out, "relative/folder/out.sig");
Library::importSignal(in, "relative/folder/out.sig");

// Export/import with an absolute path
Library::exportSignal(out, "/absolute/folder/out.sig"));
Library::importSignal(in, "/absolute/folder/out.sig"));
- Syntacts can also export and import JSON, WAV, and AIFF file formats to use with existing haptic libraries. CSV and TXT files can only be exported.
- To use the above file formats, simply change the file format in your path to your desired file type:
// JSON format
Library::exportSignal(out, "folder/out.json"));
Library::importSignal(in, "folder/out.json"));

// WAV format - can use .wav, .WAV, or .wave
Library::exportSignal(out, "folder/out.wav"));
Library::importSignal(in, "folder/out.wav"));

// AIFF format - can use .aiff, .AIFF, or .aifc
Library::exportSignal(out, "folder/out.aiff"));
Library::importSignal(in, "folder/out.aiff"));

// CSV format (import not yet supported)
Library::exportSignal(out, "folder/out.csv"));

// TXT format (import not yet supported)
Library::exportSignal(out, "folder/out.txt"));
| Relevant Header(s) | Relevant Examples(s) |
|---|---|
| Library.hpp | example_library.cpp |